Long polling
这两天在公司的项目里用了 Long polling,了解了它的实现原理,其实不像它的名字那么玄乎,只是 Ajax 和 HTTP 的类似小妙招的办法。
先解释一下 Long polling 是什么:
首先得说到传统的 Polling,Polling 是 Ajax 隔一段时间去抓取服务器上的数据,检查数据是否更新,但这样有很大问题,首先是每次请求会实用一个 HTTP request,对应的服务器就得建一个新的线程来处理这个 HTTP request,消耗网络流量、服务器资源不说,绝大多数情况下,数据短时间内是不会更新的,也就是说绝大多数的 Ajax 请求都只能无功而返。
而 Long polling 就是用来解决这个问题的。
它的核心是:
1. 做一个超时非常长的 Ajax 请求,并且在错误捕获代码里不断执行自己。2. CGI 部分接收到请求后在限定的时间内(Ajax 超时时间内)每隔一段时间(例如一秒)对数据库进行查询,可以使用 sleep 类似的方法。
3. 如果有新的数据则返回,如果即将到 Ajax 超时的时间则返回一个错误值,比如 404,这样那个非常长的 Ajax 请求会再发一个过来,继续查询。
这个办法的最大价值是有效减少了 HTTP 请求数,对服务器而言就不用开启新的线程去处理它,旧的线程如果不是因为超时,则只会在数据已经更新的情况下返回数据。可以节约大量资源,而且实时性更高。
目前,人人网的消息提示、Web 版阿里旺旺、新浪微博的新微博提示应该都是使用这种方法做的。
但这个办法对开发有
所以最好做好两套配置,一套用于产品环境的多线程环境,
我依然对那位在现有架构下想出这种办法的人表示钦佩。
这儿有范例代码,简单又实用:http://stackoverflow.com/questions/333664/simple-long-polling-example-code
春运又到了,献上更新版抓黄牛脚本。
好不容易搞定了火车票(当然不是通过酷讯或者黄牛),把去年写过的抓黄牛脚本重写了一下,提供给各位还在等待购买火车票的 Programmer 使用。说是抓黄牛,自然还包括普通转票者。原理还是通过轮询酷讯网站上的内容,但是增加了几个新特性:
- 用 re 提供的正则表达式替换掉了 SGMLParser 提高效率
- 可以轮询多个地址了,比如我到吉安和井冈山都可以,所以我要遍历两个地址
- 可以将转向链接直接打印在屏幕上了
- 提供了 Python 3 的 Package 级支持,但是因为 re 模块变更,正则表达式在 Python 3 里无法运行,暂时没心思更新了。
尽管酷讯推出了秒杀器,不过还是觉得不妥,一是没任何输出,谁知道它是否真的能秒到,二是不跨平台,在 Mac 和 Linux 上暂时无法使用。
Patches are welcome. :-)
#!/usr/bin/python
# encoding: utf-8
#
# Catch the yellow cattles script
#
# Author: Xuqing Kuang <xuqingkuang@gmail.com>
# New features:
# * Use regexp to instead of SGMLParser for performance
# * Polling multiple URL at one time.
# * Print out the redirect URL.
# * Basic packages compatible with Python 3
# TODO:
# * Use one regexp to split the href and text of link
# * Update re package usage to compatible with Python 3

import time
import os
import re

try:
    import urllib2 as urllib
except ImportError: # Python 3 compatible
    import urllib.request, urllib.error

urls = (
    "http://piao.kuxun.cn/beijing-jinggangshan/",
    "http://piao.kuxun.cn/beijing-jian/",

)

keyword = '3张'
sequence = 60

class TrainTicket(object):
    """
    Catch the yellow cattle
    """
    def __init__(self, urls, keyword, sequence = 60):
        self.urls = urls
        self.keyword = keyword
        self.sequence = sequence
        self.cache=[]
        self.html = ''
        self.links = []
        if hasattr(urllib, 'build_opener'):
            self.opener = urllib.build_opener()
        else: # Python 3 compatible
            self.opener = urllib.request.build_opener()
        self.result = []
        self.re_links = re.compile('<a.*?href=.*?<\/a>', re.I)
        # self.re_element = re.compile('', re.I) # Hardcode at following
        self.requests = []
        for url in urls:
            if hasattr(urllib, 'Request'):
                request = urllib.Request(url)
            else: # Python 3 compatible
                request = urllib.request.Request(url)

            request.add_header('User-Agent', 'Mozilla/5.0')
            self.requests.append(request)

    def get_page(self, request):
        """
        Open the page.
        """
        try:
            self.html = self.opener.open(request).read()
        except urllib.HTTPError:
            return False
        return self.html

    def get_links(self, html = ''):
        """
        Process the page, get all of links
        """
        if not html:
            html = self.html
        self.links = self.re_links.findall(html)
        return self.links

    def get_element(self, link = ''):
        """
        Process the link generated by self.get_links().
        Return list of the href and text
        """
        # FIXME: have no idea how to split the href and text with one regex
        # So use two regex for temporary solution
        href = re.findall('(?<=href=").*?(?=")', link) # Get the href attribute
        if not href:                                   # Process the no href attr
            href = ['']
        text = re.split('(<.*?>)', link)[2]            # Get the text of link a.
        href.append(text)                              # Append to the list.
        return href

    def get_ticket(self, request = None):
        """
        Generate the data structure of tickets for each URL.
        """
        if not request:
            request = self.requests[0]

        self.get_page(request)
        self.get_links()

        i = 0
        while i < len(self.links):
            link = self.get_element(self.links[i])
            if not link:
                continue
            url = link[0]
            name = link[1]
            if name and name.find(keyword) >= 0 and url not in self.cache:
                self.result.append((
                    i, name, url,
                ))
                self.cache.append(url)
            i += 1
        return self.result

    def print_tickets(self):
        """
        Process all of URLS and print out the tickets information.
        """
        while 1:
            self.result = []
            try:
                print('Begin retrive')
                for request in self.requests:
                    print('Begin scan %s' % request.get_full_url())
                    self.get_ticket(request)
                    print('Found %s urls.' % len(self.links))
                    for r in self.result:
                        print('Index: %s\nName: %s\nURL: %s\n' % (
                            r[0], r[1], r[2]
                        ))
                print('Scan finished, begin sleep %s seconds' % self.sequence)
                time.sleep(self.sequence)
            except KeyboardInterrupt:
                exit()
            except:
                raise

if __name__ == '__main__':
    tt = TrainTicket(urls, keyword, sequence)
    tt.print_tickets()
字符串反转和判断素数的 Python 语言算法范例
第一个是反转字符串,前两种是我出来丢人的,请直接看第三种。
方法1:
取出最大长度并 -1,以此为索引,依次递减,并将结果加入数组。
def reverse(string):
    if not string:
        return string
    str_list = []
    i = len(string) - 1
    while(i >= 0):
        str_list.append(string[i])
        i -= 1
    return ''.join(str_list)
方法2:
类似 C 中的位移操作,使用一个中间变量 t 记录临时值,然后将前后为置换,时间主要花在将字符串转换成数组上,实际遍历只需要上面方法的一半,但比上面方法要多消耗一个临时变量 t 的内存。当然,如果用 C 就可以直接指向内存,这样最节省内存,但是 Python 可能没更好办法。
但因为对 str 操作会造成 TypeError,所以还需要组成一个临时数组并在最后合并。
def reverse2(string):
    if not string:
        return string

    idx = 0
    length = len(string) - 1
    h_length = length / 2 # Half of length
    # 'str' object does not support item assignment for Python
    # Use C to solve it will be better.
    # So we convert it to be a list from the string.
    str_list = [x for x in string]

    while(idx <= h_length):
        t_idx = length - idx
        # Use varible t to store the temporary string
        t = str_list[t_idx]
        # Start to move the bit
        str_list[t_idx] = str_list[idx]
        str_list[idx] = t
        idx += 1

    return ''.join(str_list)
方法3:
由 @Cotton 提供,直接用数组的方式,通过本用来做间隔数的段落进行反向遍历,我只能赞叹一句,Python 太强大了!
def reverse3(string):
    return string[::-1]
另一个是求素数,没想出什么比较好的算法,只能递归,但是因为除法(求余)非常缓慢,所以我对此算法非常不满。
方法1:
这里使用一个 range 直接生成一个数组,并用 for 递归,因为我觉得一次生成数组的速度应该比多次改写一个变量速度要快,但是自然,消耗内存稍大,如果对内存有要求,也可用 while 加递减代替。
def is_prime1(num):
    # Initial to presume it's a prime
    rt = True
    # It seems every number is possible to be the one, so it have to make a range.
    for i in range(2, num):
        if num % i == 0:
            rt = False
            break
    return rt
方法2:
由 jyf1987 提供,双数的判断一次解决(但是 3、5 的倍数如何能更快地排除呢?),剩下的是单数的递归,同时引入平方根(很好的想法,因为大于平方根后的数的计算已经没有意义,因为另一个数必然也是之前计算过的,因为 N = a*b,所以 N=M^2),降低运算量,引入 xrange 降低内存使用量,因为是原生实现,我相信应该不会比直接用 range 生成数组更慢。
from math import sqrt

def is_prime2(num):
    # Checking the Type/value
    if type(num) != int:
       raise TypeError

    if num < 2:
       raise ValueError('The number must be great than 1')

    # Inital to presume it's a prime
    rt = True
    sq_num = int(sqrt(num))

    # First we detect is it prime for 2
    if num == 2:
        return rt

    if num % 2 == 0:
        rt = False
        return rt

    # Now, start to detect the odd number
    # Because all of even number could division by 2, then how about 3? -_-#
    for i in xrange(3, sq_num, 2):
        if num % i == 0:
            rt = False
            break
    return rt
冰天雪地三十六度翻转跪求更好算法~嘿嘿。。。
QPID 消息队列初步
QPID 是一种高性能 Message Bus,目前因为牵扯到工具的 SOA 架构,我的项目中将会整合它,以将自身对数据库的修改提交到 Message Bus 中, 供其它程序监听调用。
目前主流的 Message Bus 主要有以下几种:
而之所以选择 QPID 是因为它有以下几个优点(引用源):
- Supports transactions
- Persistence using a pluggable layer — I believe the default is Apache Derby
- This like the other Java based product is HIGHLY configurable
- Management using JMX and an Eclipse Management Console application - http://www.lahiru.org/2008/08/what-qpid-management-console-can-do.html
- The management console is very feature rich
- Supports message Priorities
-
Automatic client failover using configurable connection properties -
- http://qpid.apache.org/cluster-design-note.html
- http://qpid.apache.org/starting-a-cluster.html
- http://qpid.apache.org/cluster-failover-modes.html
- Cluster is nothing but a set of machines have all the queues replicated
- All queue data and metadata is replicated across all nodes that make up a cluster
- All clients need to know in advance which nodes make up the cluster
- Retry logic lies in the client code
- Durable Queues/Subscriptions
- Has bindings in many languages
- For the curious: http://qpid.apache.org/current-architecture.html
而对我而言,QPID 比较有优势的地方是,一有 Python 的 bindding(Perl 的兄弟对不起了),二是源代码比较充足。
为此我写了两个基类,简单地调用了 QPID Python 中的 Receiver 和 Sender,相对于 message_transfer 方法,这种方法可以传递 Dictionary 对象,一共三个文件,其实也可以合在一起使用。
#!/usr/bin/python

import qpid
import qpid.messaging
import logging
logging.basicConfig()

class QPIDBase(object):
    def __init__(self, host='10.66.93.193', port='5672', queue_name='tmp.testing', username='guest', password='guest'):
        """
        Arguments:
            host
            port
            queue_name
            username
            password
        """
        self.host = host
        self.port = port
        self.queue_name = queue_name
        self.username = username
        self.password = password
        self.connection = None
        self.session = None

    def init_connect(self, mechanism='PLAIN'):
        """Initial the connection"""
        url = 'amqp://guest/guest@%s:%s' %(self.host, self.port)
        self.connection = qpid.messaging.Connection(
            url = url, sasl_mechanisms=mechanism,
            reconnect=True, reconnect_interval=60, reconnect_limit=60,
            username=self.username, password=self.password
        )
        self.connection.open()

    def init_session(self):
        """Initial the session"""
        if not self.connection:
            self.init_connect()
        self.session = self.connection.session()

    def close(self):
        """Close the connection and session"""
        self.session.close()
        self.connection.close()
#!/usr/bin/python

import qpid.messaging
from datetime import datetime
from base import QPIDBase

class QPIDSender(QPIDBase):
    def __init__(self, **kwargs):
        super(QPIDSender, self).__init__(**kwargs)
        self.sender = None

    def init_sender(self):
        """Initial the sender"""
        if not self.session:
            self.init_session()
        self.sender = self.session.sender(self.queue_name)

    def send(self, content, t = 'test'):
        """Sending the content"""
        if not self.sender:
            self.init_sender()
        props = {'type': t}
        message = qpid.messaging.Message(properties=props, content = content)
        self.sender.send(message)

    def typing(self):
        """Sending the contents real time with typing"""
        content = ''
        while content != 'EOF':
            content = raw_input('Start typing:')
            self.send(content)

if __name__ == '__main__':
    s = QPIDSender()
    s.send('Testing at %s' % datetime.now())
    s.close()
#!/usr/bin/python

from pprint import pprint
from base import QPIDBase

class QPIDReceiver(QPIDBase):
    def __init__(self, **kwargs):
        super(QPIDReceiver, self).__init__(**kwargs)
        self.receiver = None

    def init_receiver(self):
        """Initial the receiver"""
        if not self.session:
            self.init_session()
        self.receiver = self.session.receiver(self.queue_name)

    def receive(self):
        """Listing the messages from server"""
        if not self.receiver:
            self.init_receiver()

        try:
            while True:
                message = self.receiver.fetch()
                content = message.content
                pprint({'props': message.properties})
                pprint(content)
                self.session.acknowledge(message)
        except KeyboardInterrupt:
            pass

        self.close()

# Test code
if __name__ == '__main__':
    r = QPIDReceiver()
    r.receive()
代码非常简单,容易读懂,使用方法是在一台 Linux Server 上安装好 qpid-cpp-server, 并且启动后,在 Client 上安装 python-qpid,然后修改一下 base.py __init__ 方法的 host 字段,或者在代码中自行指定好服务器地址,即可直接执行测试。
需要说明的是 QPID 返回的数据结构,包含可以为 Dictionary 对象的 properties 和只能为纯文本的 content 两个属性,也就是说可以将数据结构保存到 properties,而消息名称保存成 content 中,即:
        try:
            while True:
                message = self.receiver.fetch()
                content = message.content
                pprint({'props': message.properties})
                pprint(content)
                self.session.acknowledge(message)
        except KeyboardInterrupt:
            pass
一个终端执行 receiver.py 监听消息,再开一个终端执行 sender.py,将会如以下输出:
$ python ./receiver.py
{'props': {u'type': u'test', 'x-amqp-0-10.routing-key': u'tmp.testing'}}
'Testing at 2010-12-06 14:54:59.536093'
如果有兴趣试下 QPIDSender.typing() 方法,再把 Kerberos 的用户名读出来,就可以做一个 IM 啦~
问题:现在似乎 Sender 发出的消息一次只能有一个 Receiver 接收,也就是现有代码不能用于 SOA,而这理论上应该是不应该的,依然在探索。
(可以尝试打开两个 receiver.py 测试)
Django 应用程序调试
这里要介绍的是,全面的 Django app 调试,从最简单的打印变量,到使用 Django 自带的 Debug Middleware 调试 SQL,最后到全面的 Django debug toolbar 的使用。
2. Django debug context processor[1](中级)
3. Django debug toolbar[2](更简单而强大。。。 -_-#)
这是最简单的办法,在启动了 django-admin runserver 后,可将变量打印到终端上,适用于临时性的排错,当然还有其它办法,只是我觉得这种办法最简单。
下面是简单范例。
from pprint import pprint
from django.http import HttpResponse
from myapp.core.models import Case
def index(request, template = 'index.html'):
    c = Case.objects.select_related('author').get(pk = 100)
    pprint(str(c.query)) # 打印 C.objects.get(pk = 100) 调用的 SQL
    pprint(dict(c)) # 打印 C.objects.get(pk = 100) 的世纪内容。
    return HttpResponse(c.__dict__)
二、Django debug context processor[1]
该 Middleware 主要用于调试 SQL 执行情况,能够将所有的数据库查询 SQL 及花费时间打印出来,但是它要求代码使用 RequestContext,普通的 Context 和 render_to_response() 便无法直接使用了,如果之前代码使用 Context 构建,可能需要重写这部分代码。
其实我推荐在开始编写代码的时候,就使用 django.views.generic.simple.direct_to_template 来渲染页面,像如下:
from django.views.generic.simple import direct_to_template

def index(request, template = 'index.html'):
    ...
    return direct_to_template(request, template, {
        'parameters': parameters,
        'case': c,
    })
下面说安装和使用方法:
在 settings.py 的 'TEMPLATE_CONTEXT_PROCESSORS' 段中加入 'django.core.context_processors.debug',如下:
# RequestContext settings

TEMPLATE_CONTEXT_PROCESSORS = (
    'django.core.context_processors.auth',
    'django.core.context_processors.request',
    'django.core.context_processors.media',
    'django.core.context_processors.debug',
    'myapp.core.context_processors.processor',
    ...
)
在 settings.py 中加入 'INTERNAL_IPS',用于识别开发机地址,内容写入本机 IP 地址即可:
# Needed by django.core.context_processors.debug:
# See http://docs.djangoproject.com/en/dev/ref/templates/api/#django-core-context-processors-debug

INTERNAL_IPS = ('127.0.0.1', )
然后,在共享模板的开头(别告诉我你一个页面一个模板文件。。。),加入生成 SQL 列表的代码:
<body id="body">
    	{% if debug %}
	<div id="debug">
		<p>
			{{ sql_queries|length }} Quer{{ sql_queries|pluralize:"y,ies" }}
			{% ifnotequal sql_queries|length 0 %}
			(<span style="cursor: pointer;" onclick="var s=document.getElementById('debugQueryTable').style;s.display=s.display=='none'?'':'none';this.innerHTML=this.innerHTML=='Show'?'Hide':'Show';">Show</span>)
			{% endifnotequal %}
		</p>
		<table id="debugQueryTable" style="display: none;">
			<tr class="odd">
				<td>#</td>
				<td>SQL</td>
				<td>Time</td>
			</tr>
			{% for query in sql_queries %}
			<tr class="{% cycle odd,even %}">
				<td>{{ forloop.counter }}</td>
				<td>{{ query.sql|escape }}</td>
				<td>{{ query.time }}</td>
			</tr>{% endfor %}
		</table>
	</div>
	{% endif %}
        ...
</body>
最终生成的效果是在页面顶部,增加了一个 XX Quueries 项,点击 (Show) 后如下:

Django debug toolbar 是我到目前为止见过的安装最简单,功能最强大的调试工具,它的主要特性有:
* 更加完善的 SQL 调试(比 Django debug processor 更加精准,Django debug contect processor 无法处理关系查询(Select related))
* 记录 CPU 使用时间(可惜没有针对代码级的 profile,希望未来的版本能增加这个功能)
* 完整记录 HTTP Headers 和 Request 请求
* 完整记录模板 Context 内容,包括 RequestContext 和直接传入的变量
* 记录 Signals
* python logging 模块的日志支持
安装也比较简单,可以使用 yum 直接安装,也从上面的地址下载后,直接使用 setuptools 通用的安装方法安装即可。
$ tar zxvf robhudson-django-debug-toolbar-7ba80e0.tar.gz
$ cd robhudson-django-debug-toolbar-7ba80e0
$ python ./setup.py build
$ sudo python ./setup.py install
如需确保安装正常,从 Python shell 里看看能否 import 即可,不出错,即安装正常:
$ python
Python 2.6.1 (r261:67515, Feb 11 2010, 00:51:29)
[GCC 4.2.1 (Apple Inc. build 5646)] on darwin
Type "help", "copyright", "credits" or "license" for more information.
>>> import debug_toolbar
>>>
然后是配置你的 settings.py。
我的调试 settings.py 和在产品服务器上运行的是不一样的,我也建议最好将二者分开,因为 Django app 开启 Debug 后对性能损耗非常严重。
将下面红字加入你自己的 settings.py 文件:
MIDDLEWARE_CLASSES = (
    ...
    'debug_toolbar.middleware.DebugToolbarMiddleware',
)

INSTALLED_APPS = (
    ...
    'debug_toolbar'
)

TEMPLATE_DIRS = (
    ...
    '/Library/Python/2.6/site-packages/django_debug_toolbar-0.8.3-py2.6.egg/debug_toolbar/templates/', #按需修改!指向 debug_toolbar 的模板目录。
)

DEBUG_TOOLBAR_PANELS = (
             'debug_toolbar.panels.version.VersionDebugPanel',
             'debug_toolbar.panels.timer.TimerDebugPanel',
             'debug_toolbar.panels.settings_vars.SettingsVarsDebugPanel',
             'debug_toolbar.panels.headers.HeaderDebugPanel',
             'debug_toolbar.panels.request_vars.RequestVarsDebugPanel',
             'debug_toolbar.panels.template.TemplateDebugPanel',
             'debug_toolbar.panels.sql.SQLDebugPanel',
             'debug_toolbar.panels.signals.SignalDebugPanel',
             'debug_toolbar.panels.logger.LoggingPanel'
  )
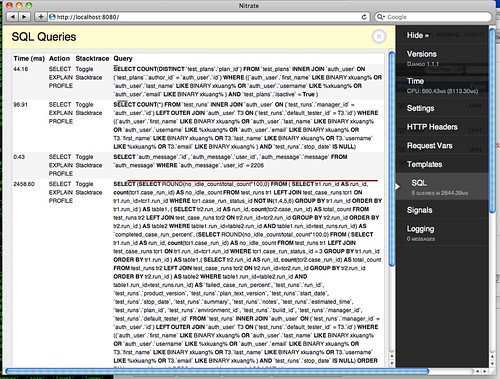
然后使用 django-admin.py runserver 启动测试服务器,下图是 Django debug toolbar 的 SQL 查询页面。
相关链接:
[1] http://www.djangosnippets.org/snippets/93/
[2] http://github.com/robhudson/django-debug-toolbar/downloads
Django 下的 Kerberos 登录
Kerberos 这种统一用户名和密码进行登录的方式在各大公司(尤其外企)内部应该都得到广泛应用,它以其安全、高效和易于管理等特性得到了很多系统管理员的喜爱。
目前网上对于 Kerberos 登录原理的描述都过于复杂,其实它的实现非常简单,当你向一个部署了 Kerberos 的应用服务器发起登录请求的时候,服务器会去 /etc/krb5.conf 里描述的 KDC 服务器用 Kerberos 协议发起一个登录请求,如果用户名密码验证通过,将会向服务器发一个票(Ticket),否则将会引出一个错误。然后服务器可以将票发给客户端,以后客户端就可以用这张票进行其它操作。与火车票和电影票一样,Kerberos 的票,也是有使用时间限制的,如果不经过特殊设置,这张票的超时时间大约是 6 个小时。
而在 Django 里使用 Kerberos 登录,有两种办法,一种是由 Django 直接向 KDC 验证密码,另一种是在 Apache 上使用 mod_auth_kerb 模块,由浏览器来处理登录请求。
这两种办法其实都是对 Django Auth Backend 的重载,所有的 Auth Backend 都位于 django/contrib/auth/backends.py 里,这里[2]也有一个使用 Email 来进行验证的范例,我受此启发,写了这两个例子,希望也能抛砖引玉,能给你们更多启发。
第一种 - 由 Django 直接向 KDC 验证密码:
这种办法比较简单,需要在 web server 上装好 python-kerberos 包,并且配置好 /etc/krb5.conf,详细的配置方法,最好咨询 IT 部门,配置成功后在服务器上用 Kerberos 上有的普通用户运行 kinit,如果能够密码验证通过就行。
并且在 Django 的 settings.py 里写入类似下面这行,定义 Kerberos 的 Realm:
# Kerberos settings
KRB5_REALM = 'EXAMPLE.COM'
与上面的 Email 验证例子类似的是,我们需要对 authenticate 方法进行重载,加入 kerberos 认证代码,python-kerberos 已经提供了 checkPassword 方法。
try:
    auth = kerberos.checkPassword(
        username, password, '',
        settings.KRB5_REALM
    )
except kerberos.BasicAuthError, e:
    return None
完整代码如下:
import kerberos
from django.conf import settings
from django.contrib.auth.backends import ModelBackend
from django.contrib.auth.models import User

class KerberosBackend(ModelBackend):
    """
    Kerberos authorization backend for TCMS.

    Required python-kerberos backend, correct /etc/krb5.conf file,
    And correct KRB5_REALM settings in settings.py.

    Example in settings.py:
    # Kerberos settings
    KRB5_REALM = 'EXAMPLE.COM'
    """
    def authenticate(self, username=None, password=None):
        try:
            auth = kerberos.checkPassword(
                username, password, '',
                settings.KRB5_REALM
            )
        except kerberos.BasicAuthError, e:
            return None

        try:
            user = User.objects.get(username=username)
        except User.DoesNotExist:
            user = User.objects.create_user(
                username = username,
                email = '%s@%s' % (username, settings.KRB5_REALM.lower())
            )

        user.set_unusable_password()
        user.save()
        return user
第二种:Apache 上使用 mod_auth_kerb:
这种方法略有复杂,部署它需要向 KDC 申请一个 keytab 文件,以授权该 Web Server 向 KDC 发起请求,并且需要安装和配置 mod_auth_kerb(很简单,后面有),并且 /etc/krb5.conf 一点也不能少。
但是好处也是非常明显的,上面那种依然是使用 Django Auth Contrib 的 Session Manager 来负责登录信息的维持,但是这种方法将能够完全使用 Kerberos 自身提供的 Features,包括登录维持,和 kinit 的支持,也就是说,只要在本机上使用 kinit 成功登录过一次,用 Firefox (目前似乎在 Linux 上只支持该浏览器)访问部署了 mod_auth_kerb 的网站,将都不再需要登录。
它的原理包括两种条件,一种是没有在本机执行 kinit 的,使用 Firefox 直接访问服务器,服务器将会返回一个 401 Authorization Required 错误,这时 Firefox 会弹出对话框询问你的 Kerberos 用户名和密码,并提交你的密码。另一种在本机已经执行过 kinit 的,Firefox 会去读取你客户端的 Kerberos ticket 缓存,如果没有过期的话,就会使用它。无论哪种办法,Firefox 都将在 HTTP Header 里添加一个 'Authorization' 段,并且加入 Basic Authorization 验证方式,例如我本机上的:
Authorization Basic eGt1YW5nOkxvdmVvZnJvYWQuMTIz
使用这种部署方式,在 Django 1.1 版本以下,还没有比较好的解决办法,但好在 Django 1.1 提供了 RemoteUserBackend 后端,依然在 django/contrib/auth/backends.py 路径里,通过阅读它的代码,我们可以看到它其实依然是个 ModelBackend 的继承,而 Django 的 Request Handler 已经默认将 HTTP Meta 里的 REMOTE_USER 段给加入处理范围之内了,因此 RemoteUserBackend 的 ’authenticate‘ 与 ModelBackend 不太一样。 :-)
其实代码都已经写好,我们只需要处理一下拿到用户后的处理办法('configure_user' 方法)和处理用户名的方法('clean_username' 方法)就可以了。
我这里在拿到用户后,出于保护密码的原则,为该用户设置了一个无效密码('user.set_unusable_password()' 方法),并且设置了该用户的 Email。 同时,因为 RemoteUserBackend 默认返回的用户名是 ‘[username]@[KRB5_REALM]',所以我也把后面的 REALM 给去掉,直接贴代码:
from django.conf import settings
from django.contrib.auth.backends import RemoteUserBackend

class ModAuthKerbBackend(RemoteUserBackend):
    """
    mod_auth_kerb modules authorization backend for TCMS.
    Based on DjangoRemoteUser backend.

    Required correct /etc/krb5.conf, /etc/krb5.keytab and
    Correct mod_auth_krb5 module settings for apache.

    Example apache settings:

    # Set a httpd config to protect krb5login page with kerberos.
    # You need to have mod_auth_kerb installed to use kerberos auth.
    # Httpd config /etc/httpd/conf.d/<project>.conf should look like this:

    <Location "/">

        SetHandler python-program
        PythonHandler django.core.handlers.modpython
        SetEnv DJANGO_SETTINGS_MODULE <project>.settings
        PythonDebug On
    </Location>

    <Location "/auth/krb5login">
        AuthType Kerberos
        AuthName "<project> Kerberos Authentication"
        KrbMethodNegotiate on
        KrbMethodK5Passwd off
        KrbServiceName HTTP
        KrbAuthRealms EXAMPLE.COM
        Krb5Keytab /etc/httpd/conf/http.<hostname>.keytab
        KrbSaveCredentials off
        Require valid-user
    </Location>

    """
    def configure_user(self, user):
        """
        Configures a user after creation and returns the updated user.

        By default, returns the user unmodified.
        Here, the user will changed to a unusable password
        and set the email.
        """
        user.email = user.username + '@' + settings.KRB5_REALM.lower()
        user.set_unusable_password()
        user.save()
        return user

    def clean_username(self, username):
        """
        Performs any cleaning on the "username" prior to using it to get or
        create the user object.  Returns the cleaned username.

        For more info, reference clean_username function in
        django/auth/backends.py
        """
        return username.replace('@' + settings.KRB5_REALM, '')
Django 是一个很强大的框架,虽然缺点和优点都同样的明显,有些甚至是由于 Python 语言或者类库造成的问题,但是因为其使用的便利性,高效的开发,而且其开发小组也非常活跃,使其特性的添加非常频繁,而且网上也有大量资源,例如 Django Snippets 网站,因此依然有着非常巨大优势。而通过阅读它的代码,往往都能获得更多启发。
链接:
写了个监视酷讯火车票的 Python 程序
受不了了,买火车票买不到,只好盯上黄牛票了,可是没法不停地刷页面啊,刚刚就错过了一个发布了 20 分钟的黄牛票,打电话回去时已经打不通了。。。-_-#
就写了个程序来解决这个问题,粘了一堆代码(参考太多,头一次写这种东西,原作者勿怪),总算成了,可能有 bug,欢迎提交 patch 或者更好的解决办法。
可以通过修改下面的参数来修改程序执行:
url = "http://piao.kuxun.cn/beijing-jinggangshan/" # 把火车票的搜索地址粘在这里,这里假设是北京到井冈山的
key = "2张"                                        # 搜索关键字,我得俩人啊。。。
sequence = 60#60 * 5                               # 搜索间隔,给服务器压力别太大,每分钟一次就行了。
#!/usr/bin/python
# encoding: utf-8

import urllib2
import mailbox
import time
import os
import re
from sgmllib import SGMLParser

class URLListName(SGMLParser):
    is_a=""
    name=[]
    def start_a(self, attrs):
        self.is_a=1
    def end_a(self):
        self.is_a=""
    def handle_data(self, text):
        if self.is_a:
            self.name.append(text)

url = "http://piao.kuxun.cn/beijing-jinggangshan/"
key = "2张"
sequence = 60#60 * 5

request = urllib2.Request(url)
request.add_header('User-Agent', 'Mozilla/5.0')
opener = urllib2.build_opener()
data = opener.open(request).read()

ticket_name = URLListName()
ticket_name.feed(data)
cache=[]

while 1:
    try:
        print "beign retrive"
        data = opener.open(request).read()
        ticket_name.feed(data)
        print "beign scan"

        for result in ticket_name.name:
            if result and result.find(key) >= 0:
                if result in cache:
                    pass
                else:
                    print "found:" + result
                    cache.append(result)

        print "scan finished, begin sleep " + str(sequence) + " seconds."
        time.sleep(sequence)
    except:
        raise
Python 技巧:@classmethod 修饰符
通常情况下,如果我们要使用一个类的方法,那我们只能将一个类实体化成一个对象,进而调用对象使用方法。
比如:
def __init__:
...
def print_hello(self):
print "Hello"
要用 print_hello() 就得:
hlo.print_hello()
Hello
如果用了 @classmethod 就简单了。
[转帖] Python 中 switch 的解决办法
其他语言中,switch语句大概是这样的
{
case value1: do_some_stuff1();
case value2: do_some_stuff2();
…
case valueN: do_some_stuffN();
default: do_default_stuff();
}
而python本身没有switch语句,解决方法有以下3种:
一个 Django 的超简单的数据库应用
昨天 Launch & Learn 的时候,做了个简单的 Django 的数据库应用,以配合 Li Li Zhang 的 ORM Course。
其实用 Django 做数据库应用真的很简单,不过比较适合用于重头设计的 Database Schema,然后用 syncdb 来同步数据库。
目前 Django 对 ForeignKey 和 One to One, One to Many, Many to Many 支持得都不错,最大的缺陷还是缺乏 Join 的支持导致多表联查的性能不好,这也是我在做开发的过程中碰到的最大问题。
其实用 Django 重头做一个数据库开发非常简单,用下面几步就可以了。
FIRST:
Create new project and a new app with django-admin.py
$ django-admin.py startproject [project_name]
$ cd [project_name]
$ django-admin.py startapp [app_name]

SECOND:
Edit the settings.py file to adjust db settings and installed apps.

THIRD:
Edit the [app_name]/models.py to modeling the database schema

FOURTH:
Edit the [prject_name]/urls.py to adjust the path of URL.

FIFTH:
Edit the [app_name]/views.py to realize your function.

SIXTH:
To run the manage.py to start the test server in the project.
$ ./manage.py runserver

THE END:
Use your browser to navigate to your http://localhost:8000 and enjoy in it. :-)
这里提供了一个范例,也是昨天在 Launch and Learn 上演示过的:www.box.net/shared/6036abumgv 中的 lnl.tar.bz2 文件,里面提供的 Steps 其实就是上面那段,只是代码中也提供了注释以方便阅读。
在 Mac OS X 上为 Django 安装 MySQL-python 1.2.2
先去 Sun 网站上下载最新版本的 MySQL, 再去 djangoproject.org 上下载最新版本的 Django 1.0 release, 并且正常安装.
然后用 easyinstall mysql-python, 发现无法正常安装.
查看 easyinstall 的下载路径, 用下面的命令下载并且解压缩
$ cd /tmp
$ curl -o MySQL-python-1.2.2.tar.gz http://internap.dl.sourceforge.net/sourceforge/mysql-python/MySQL-python-1.2.2.tar.gz
$ tar xvf MySQL-python-1.2.2.tar.gz
$ cd MySQL-python-1.2.2
然后修改 site.cfg, 修改下面内容:
由
#mysql_config = /usr/local/bin/mysql_config
改成
mysql_config = /usr/local/mysql/bin/mysql_config
否则会出现找不到 MySQL config 的问题:
...
  File "/tmp/easy_install-nHSsgl/MySQL-python-1.2.2/setup_posix.py", line 24, in mysql_config
EnvironmentError: mysql_config not found
然后修改 _mysql.c, 把第 37 到 39 行注释掉, 如下:
//#ifndef uint
//#define uint unsigned int
//#endif
否则会出现:
In file included from /usr/local/mysql/include/mysql.h:47,
                 from _mysql.c:40:
/usr/include/sys/types.h:92: error: duplicate 'unsigned'
/usr/include/sys/types.h:92: error: two or more data types in declaration specifiers
error: command 'gcc' failed with exit status 1
然后再用 python ./setup.py build 编译
$ python ./setup.py build
running build
running build_py
copying MySQLdb/release.py -> build/lib.macosx-10.5-i386-2.5/MySQLdb
running build_ext
building '_mysql' extension
gcc -fno-strict-aliasing -Wno-long-double -no-cpp-precomp -mno-fused-madd -fno-common -dynamic -DNDEBUG -g -Os -Wall -Wstrict-prototypes -DMACOSX -I/usr/include/ffi -DENABLE_DTRACE -pipe -Dversion_info=(1,2,2,'final',0) -D__version__=1.2.2 -I/usr/local/mysql/include -I/System/Library/Frameworks/Python.framework/Versions/2.5/include/python2.5 -c _mysql.c -o build/temp.macosx-10.5-i386-2.5/_mysql.o -g -Os -arch i386 -fno-common -D_P1003_1B_VISIBLE -DSIGNAL_WITH_VIO_CLOSE -DSIGNALS_DONT_BREAK_READ -DIGNORE_SIGHUP_SIGQUIT
gcc -Wl,-F. -bundle -undefined dynamic_lookup -arch i386 -arch ppc build/temp.macosx-10.5-i386-2.5/_mysql.o -L/usr/local/mysql/lib -lmysqlclient_r -lz -lm -lmygcc -o build/lib.macosx-10.5-i386-2.5/_mysql.so
ld: warning in build/temp.macosx-10.5-i386-2.5/_mysql.o, file is not of required architecture
ld: warning in /usr/local/mysql/lib/libmysqlclient_r.dylib, file is not of required architecture
ld: warning in /usr/local/mysql/lib/libmygcc.a, file is not of required architecture
然后再用 python ./setup.py install 安装
$ sudo python ./setup.py install
Password:
running install
running bdist_egg
running egg_info
writing MySQL_python.egg-info/PKG-INFO
writing top-level names to MySQL_python.egg-info/top_level.txt
writing dependency_links to MySQL_python.egg-info/dependency_links.txt
reading manifest file 'MySQL_python.egg-info/SOURCES.txt'
reading manifest template 'MANIFEST.in'
writing manifest file 'MySQL_python.egg-info/SOURCES.txt'
installing library code to build/bdist.macosx-10.5-i386/egg
running install_lib
running build_py
copying MySQLdb/release.py -> build/lib.macosx-10.5-i386-2.5/MySQLdb
running build_ext
creating build/bdist.macosx-10.5-i386
creating build/bdist.macosx-10.5-i386/egg
copying build/lib.macosx-10.5-i386-2.5/_mysql.so -> build/bdist.macosx-10.5-i386/egg
copying build/lib.macosx-10.5-i386-2.5/_mysql_exceptions.py -> build/bdist.macosx-10.5-i386/egg
creating build/bdist.macosx-10.5-i386/egg/MySQLdb
...
然后用下面的命令进行测试:
$ cd ~
$ python
Python 2.5.1 (r251:54863, Apr 15 2008, 22:57:26)
[GCC 4.0.1 (Apple Inc. build 5465)] on darwin
Type "help", "copyright", "credits" or "license" for more information.
>>> import MySQLdb
>>> MySQLdb.apilevel
'2.0'
>>> import django
>>> print django.VERSION
(1, 0, 'final')
如果能正常输出就没有问题了 :-)